Overview
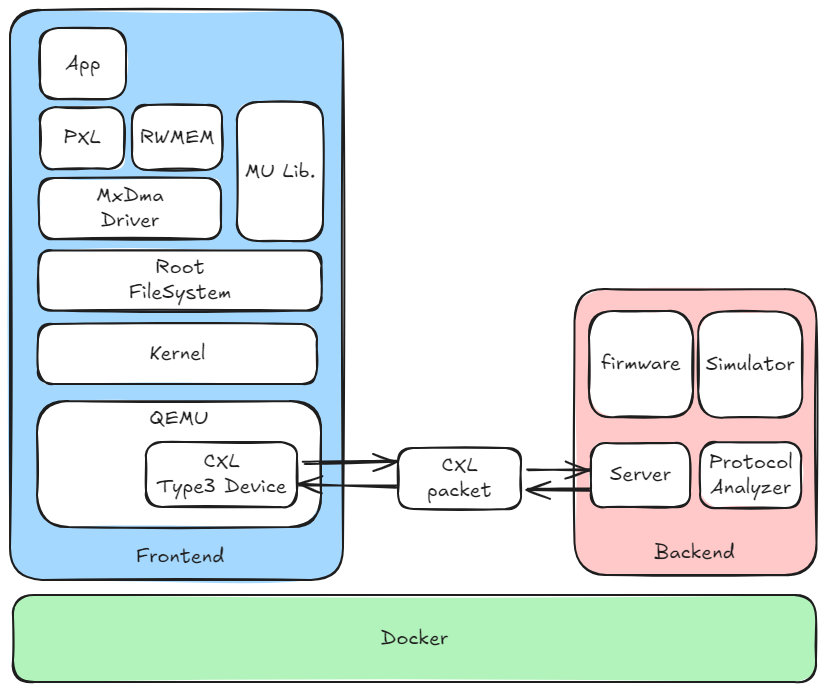
XCENA SDK Emulator provides a comprehensive software environment for running and testing computation CXL memory, enabling developers to work without the need for dedicated hardware devices. This powerful emulator bridges the gap between concept and deployment, offering a flexible and efficient development platform.
- Hardware Independence: Accurately emulates the computational capabilities of CXL memory, eliminating the need for physical hardware and reducing development costs.
- Developer-Friendly Interface: Provides a seamless and intuitive interface that mirrors the behavior of real CXL memory devices, ensuring smooth integration and ease of use.
- Accelerated Prototyping: Facilitates the design, testing, and validation of prototypes in a controlled environment, allowing developers to iterate faster before deploying to actual hardware.
- Scalability: Supports a wide range of scenarios, from small-scale testing to complex, large-scale applications, making it suitable for diverse use cases.
graph TD
    subgraph QEMU
        CXLType3Device[CXL Type3 Device]
    end

    subgraph GuestOS[Guest OS]
        Applications
        RootFileSystem[Root File System]
        Kernel
    end

    DeviceSimulator[Device Simulator]

    GuestOS <--> QEMU
    QEMU <--> |CXL packet| DeviceSimulator

-
QEMU
In this modular architecture, QEMU plays a central role in the emulator by bridging the gap between the Guest OS and the Device Simulator. As a client of the socket interface, QEMU utilizes CXL packets to standardize communication with device simulator. The native backend of QEMU’s memory region is overridden with a software-defined CXL packet mechanism, where memory access operations are intercepted and processed as custom CXL packets. -
Device Simulator
We provide a standalone device simulator that interfaces with QEMU using the previously mentioned CXL packets. Device simulator processes requests from QEMU, simulates device behavior through firmware emulation, and communicates via a socket interface.
Emulator User Guide
The run.sh script in the emulator directory provides a wrapper to launch XCENA SDK Emulator. This guide outlines available flags, usage, and examples.
Basic Usage
./run.sh
Launches Emulator with:
- Default QEMU binary
- Default kernel
- Ubuntu root filesystem
- One XCENA CXL memory device
Available Options
| Option | Description | Default |
|---|---|---|
-d, --debug | Run QEMU with CXL debug logs | Off |
-q, --qemu <path> | Path to the QEMU directory | qemu |
-k, --kernel <path> | Path to the kernel image | kernel |
-r, --rootfs <type> | Choose root file system: debian, fedora, ubuntu | ubuntu |
-x, --cxl <file> | Path to CXL memory configuration file | cfg/cxl/pmem |
-p, --port <port> | Host network port | generated automatically based on UID |
--no-kvm | Disable KVM acceleration | Off (KVM Enabled) |
--kgdb | Enable kernel debugging with GDB | Off |
-g, --gdb | Attach GDB to QEMU for debugging | Off |
-n, --numdev <number> | Number of CXL devices to attach | 1 |
--name | Name of the screen session | qemu_$(whoami) |
--help | Show help message | - |
Example Commands
1. Run QEMU with CXL debug logs
./run.sh --debug
2. Disable KVM (to avoid illegal instruction errors when using SIMD operations in QEMU)
./run.sh --no-kvm
3. Start QEMU with 2 XCENA CXL devices
./run.sh -n 2